

Sowing In Seed-Starting Containers – Photo Essay
Please read the packet back instructions for each variety – our seed packets provide you with specific info on the right time to sow each kind of seed. This photo essay is about seeds that are started in spring and summer to move right into the garden beds. (For seeds that must be started earlier indoors, see Starting Tomatoes Indoors and Transplanting Seedlings
Here's how to start small seeds in seed starting containers and then transplant them into the garden when they get big enough to thrive easily and happily. This technique allows you to monitor the germination process and carefully tend tiny baby seedlings. Other big benefits are that you don't have to worry about losing emerging seedlings to competition from weeds or marauding birds, slugs, and snails, and you plant healthy seedlings into each garden bed at the perfect spacing for best growth.
Be sure your seed-starting containers are large enough – at least several inches deep and have drainage holes. If you use a container that has individual "cells" or pockets in it, make sure each is several inches wide and deep because smaller-sized cells dry out too quickly and don't have enough room for roots.
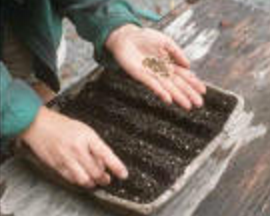
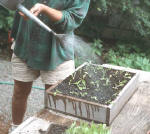
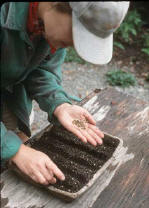 1) Sow seeds according to packet instructions. For large seeds, make a shallow furrow with a pencil or chopstick.
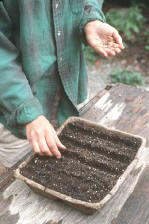 2) Close the furrow over the seeds or sprinkle on more seed starting mix to cover lightly (see packet back for specific depth of coverage) then water gently to settle mix around seeds.
 3) When seedlings have several sets of true leaves, transplant them to a new container to give them more room to develop. This process is called "pricking out."
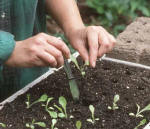 4) Lift seedlings carefully, holding them by leaves (not by stem or roots), and transplant about 2 inches apart in the new container. Now they can grow big enough to go out in the garden when conditions are favorable. (See packet instructions)
 5) After transplanting to better spacing, water gently to settle seedlings in their new home.
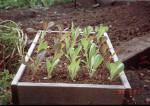 6) When seedlings are well established and weather permits, acclimate them gradually to outdoor conditions. This is called "hardening off" and is important to do before planting mature seedlings out in the garden.
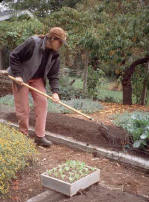 7) Prepare the garden bed for seedlings carefully by weeding, loosening soil, breaking up clumps, incorporating organic material and shaping the bed.
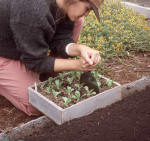 8) When planting into the garden bed, using a putty knife or trowel is a good way to separate seedlings into individual blocks without disturbing the roots any more than necessary.
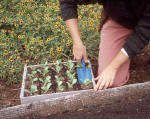 9) To plant, carefully remove each seedling block from the container. Try to retain as much soil around the rootball as possible.
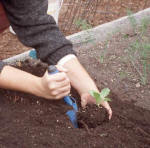 10) Plant seedling at the same depth it was in the container (except tomatoes, which you can plant deeper). Follow packet instructions for proper spacing between plants to allow for growth and mature size.
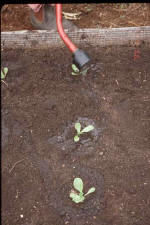 11) Water newly planted seedlings gently but thoroughly to settle soil around the roots.
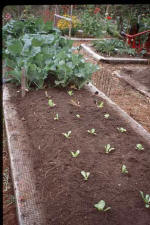 12) Properly spaced and comfortably settled into the garden, your seedlings will quickly adjust to their new home in a day or two and begin to grow happily.1) Sow seeds according to packet instructions. For large seeds, make a shallow furrow with a pencil or chopstick.2) Close the furrow over the seeds or sprinkle on more seed starting mix to cover lightly (see packet back for specific depth of coverage) then water gently to settle mix around seeds.3) When seedlings have several sets of true leaves, transplant them to a new container to give them more room to develop. This process is called "pricking out."4) Lift seedlings carefully, holding them by leaves (not by stem or roots), and transplant about 2 inches apart in the new container. Now they can grow big enough to go out in the garden when conditions are favorable. (See packet instructions)
5) After transplanting to better spacing, water gently to settle seedlings in their new home.6) When seedlings are well established and weather permits, acclimate them gradually to outdoor conditions. This is called "hardening off" and is important to do before planting mature seedlings out in the garden.7) Prepare the garden bed for seedlings carefully by weeding, loosening soil, breaking up clumps, incorporating organic material and shaping the bed.8) When planting into the garden bed, using a putty knife or trowel is a good way to separate seedlings into individual blocks without disturbing the roots any more than necessary.9) To plant, carefully remove each seedling block from the container. Try to retain as much soil around the rootball as possible.10) Plant seedling at the same depth it was in the container (except tomatoes, which you can plant deeper). Follow packet instructions for proper spacing between plants to allow for growth and mature size.11) Water newly planted seedlings gently but thoroughly to settle soil around the roots.12) Properly spaced and comfortably settled into the garden, your seedlings will quickly adjust to their new home in a day or two and begin to grow happily.
12) Properly spaced and comfortably settled into the garden, your seedlings will quickly adjust to their new home in a day or two and begin to grow happily.1) Sow seeds according to packet instructions. For large seeds, make a shallow furrow with a pencil or chopstick.2) Close the furrow over the seeds or sprinkle on more seed starting mix to cover lightly (see packet back for specific depth of coverage) then water gently to settle mix around seeds.3) When seedlings have several sets of true leaves, transplant them to a new container to give them more room to develop. This process is called "pricking out."4) Lift seedlings carefully, holding them by leaves (not by stem or roots), and transplant about 2 inches apart in the new container. Now they can grow big enough to go out in the garden when conditions are favorable. (See packet instructions)
5) After transplanting to better spacing, water gently to settle seedlings in their new home.6) When seedlings are well established and weather permits, acclimate them gradually to outdoor conditions. This is called "hardening off" and is important to do before planting mature seedlings out in the garden.7) Prepare the garden bed for seedlings carefully by weeding, loosening soil, breaking up clumps, incorporating organic material and shaping the bed.8) When planting into the garden bed, using a putty knife or trowel is a good way to separate seedlings into individual blocks without disturbing the roots any more than necessary.9) To plant, carefully remove each seedling block from the container. Try to retain as much soil around the rootball as possible.10) Plant seedling at the same depth it was in the container (except tomatoes, which you can plant deeper). Follow packet instructions for proper spacing between plants to allow for growth and mature size.11) Water newly planted seedlings gently but thoroughly to settle soil around the roots.12) Properly spaced and comfortably settled into the garden, your seedlings will quickly adjust to their new home in a day or two and begin to grow happily.